Business Description

Berthoud wedding plannebjhjhr A little bird told me you'd like some help planning your event.....

.

.
Showing posts with label DIY. Show all posts

Tuesday, January 7, 2014

Crafts and Cocktails


I recently discovered one of my new favorite places.  Its called Upstairs Circus and its too bad its in Denver, about 45 minutes away from where I live.  Here's the gist of the place, you pick a day on their calendar, you go to their website to see what the theme of the day is (e.g. "Home Sweet Home" or "Designer Inspired,") you choose from one of about five different choices of craft projects, (depending on the theme, you may paint a canvas, make jewelry, sew a pillow cover, do some wood burning, etc.) Sign up for what you want; include details in your reservation whether you will be coming with a friend, or a group or whatever.

When you arrive, they give you ALL of the supplies to make your project, direct you towards the in house equipment, hand you a detailed sheet of instructions and make sure that you know that they are available to you if you have any questions or need any help.  You go find a seat at one of their crafting tables and then, here's the best part, well one of the best parts, you head to their full bar to order a cocktail to sip while you craft!  They have some delicious mixed drink recipes, as well as an espresso machine.  If you book a package from them, it will include your craft, drink tickets and their truffle oil popcorn, served out of a retro popcorn machine. I made a bracelet and (even though it took me a total of 4 hours to make it, versus the 1-2 it is supposed to take,) I love it!

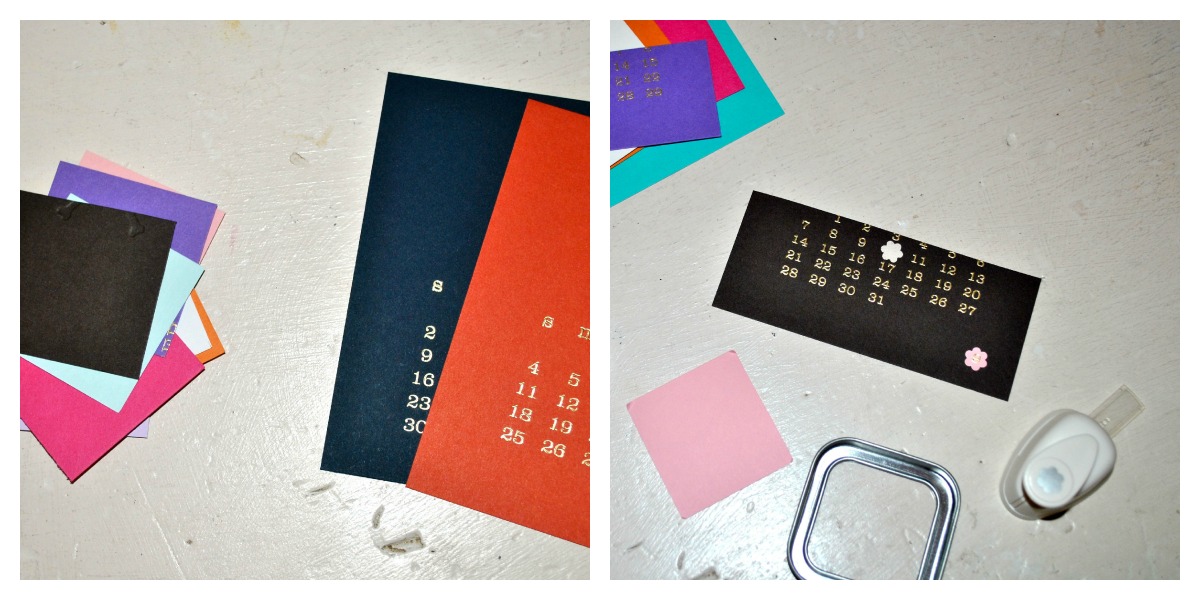
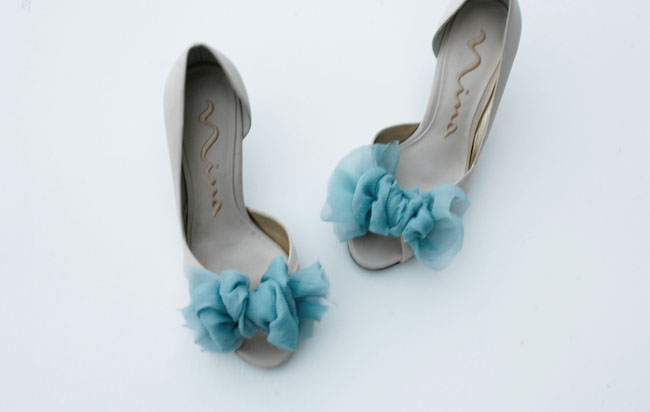
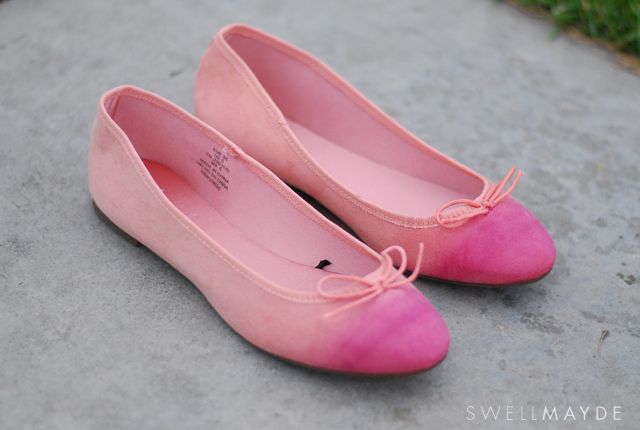
So then I started dreaming about how cool it would be to open a store like that of my own.  I imagined the many options of some of the DIY projects that I could offer........Well, it probably won't happen anytime soon, so for now, I just made a Pinterest board of ideas.  Here are some of my favorites that I can share with you:


Happy DIYing until we meet at my future store, maybe I'll call it Crafts and Cocktails.  


Monday, May 20, 2013

6 End of the Year Teacher Gift Ideas


Wow! It's the last week of school already and time to thank our teachers for all that they did for our kids this year!  As I do whenever I am in need of some last minute creative inspiration, I turn to Pinterest.  Here are a few ideas (some even include some free printables,) for you to say thank you to your child's teacher.  Happy summer!

Thanks for helping me GROW!

I love my TEAcher!

Summer Fun Basket

Apple Coasters

Teachers plant seeds of knowledge

Thanks for making me one smart COOKIE


Saturday, December 1, 2012

DIY Advent Calendar


My family usually just buys the cardboard advent calendar at the grocery store every year, with the little chocolates.  Well this year I decided that I wanted to do something a little more contemporary and creative. Advent calendars are fun, especially if you have little kids, like mine who are constantly asking, "how many more days until (insert holiday or major event here)?"


Of course I turned to Pinterest first for inspiration.  You can visit my Advent Calendar Board here.

I started out by recycling this adorable desktop calendar that I got as a gift last year from Jack and Lulu.  I just loved the color scheme and the fact that the numbers were already embossed, would save me some time.
I cut out 2 cardstock squares from the corners of each calendar page and a corresponding number with a little flower hole punch.  Remember, you will only need numbers 1-24 (or if you are starting this project later into December, you can really count down from any number of days.)
I found these cute little tins in the wedding favor section at my local hobby store.  They have clear lids so I stuck the card stock squares with glued on numbers into the lid of the box.  I then added a magnet to the back of the tin.

Add a cute little toy or candy to each tin.  I also added a few holiday activities like "make cookies, drink cocoa, or go ice skating" to a few of the days.

You can stick the magnetic tins on your fridge, or forgo the magnets altogether.  I have a white magnetic board in my office that I found at Ikea that will work wonderfully.

I'd love it if you shared your DIY advent calendars so that I can see all the ways that others count down to Christmas!


Monday, August 20, 2012

DIY Watercolor Party Supplies

On a budget?  Feeling crafty? Looking for a low-key party theme to fit any occasion from birthday to bridal shower to end of summer popsicle party?  Try some of these Watercolor Party DIY projects for making your own party supplies.

Painted Paper Cups
from Design Sponge
Materials:
  • white, paper coffee cups
  • paintbrush
  • acrylic paint
  • water
Instructions:
  1. Squeeze some of the acrylic paint into a cup and slowly dilute with water, while mixing.
  2. Apply thin stokes of the paint to your cups- don't use too much and don't paint the brim where people's lips will be.
  3. Allow about an hour to dry.
Watercolor Tags
from Wed in Love
Materials:
  • watercolor paints
  • painting sponge
  • glass of water
  • a white crayon
  • a paper plate
  • white craft tags
  • string or twine
Instructions:
  1. Write or draw on the tags with the white crayon.  (Some sample phrases may include "thank you" or "happy birthday" or "i love you," depending on the occasion.)
  2. Dip the sponge into your chosen color and paint onto the craft tag.
  3. Allow to dry.
  4. Tie onto a gift bag, hang on a party favor or clip onto clothesline to use as a seating arrangement placecard.  
Flower Bows
from Victoria Hudgins- Bloesem
Materials:
  • white or colored, store bought gift wrap bows
  • scissors
  • watercolor paints
  • a paintbrush
Instructions:
  1. Paint the bows with the watercolors, however you please.
  2. Allow to dry for about an hour.
  3. Cut the center loops of the store bought bows with your scissors.
  4. Layer 2 or 3 bows on top of each other to combine a variety of colors.
  5. Staple through the middle to keep the bows together.
  6. Use to decorate gifts, make hair accessories, pins, etc.
Popsicle Mini Tote Favor Bags
from Creature Comforts

Materials:
Instructions:
  1. Print popsicle iron-on onto transfer paper.
  2. Cut out the popsicle shape as close to the design as possible.
  3. Put transfer face down on fabric bag and iron on according to transfer paper directions.
  4. When transfer is fully adhered and cool to the touch, peel the paper backing off.
  5. Fill with treats and disperse to your popsicle loving party pals!
Watercolor Kit
from Tip Junkie
Materials:
  • store bought, individual paint sets (can be found at the dollar store or most big box stores)
  • watercolor paints
  • a paint brush
  • scissors
  • masking tape
  • your choice of wording printed on textured, white cardstock paper (Grab my free printable below by righting clicking and choosing Save As)

Instructions:
  1. Print off the free printable above or your choice of wording, using bubble letters, onto textured white cardstock paper (this type of paper will allow for the paint to bleed.)
  2. Using alternating paint colors, paint over the bubble letters with the watercolor paints. (Follow your inner child and do NOT stay in the lines!)
  3. Allow to dry.
  4. Cut out into individual tag strips.
  5. Use masking tape to tape tags onto individual paint sets.
  6. Give out as party parting gifts.

Watercolor Party Streamers
from Dandee Designs
Materials:
  • plain, white party streamer
  • glass bowls
  • cooling racks
  • food coloring
Instructions:
  1. Fill bowls with 1 1/2 cups of room temperature water.
  2. Add food coloring to bowls (more drops for deeper colors.)
  3. Place rolled up white party streamers into bowls to absorb the colored water. (Do not leave in for too long, just long enough to soak up some of that color on the bottom portion of the roll.)
  4. Place rolls on drying racks and allow to dry. (May take a few days to dry completely.)
I'd love to see your DIY Watercolor Party projects!  Please feel free to email me pictures to share!

Wednesday, July 25, 2012

DIY Wedding Shoes

Having trouble finding the perfect way to dress up your wedding tootsies? Not yet overloaded on wedding DIY projects? Here are some tutorials on how to glamorize your wedding shoes!

Chiffon Peep Toe
Green Wedding Shoes Wedding Blog
Materials:
  • A comfortable peep toe shoe
  • Fishing line
  • 1 yard of silk chiffon fabric

Instructions:
  1. Cut fabric into two 15" x 13" pieces and fold accordion style.
  2. Tie the fabric in a loose knot around the middle of the front of the shoe.
  3. Cut four pieces of fishing line, 30" long each.  
  4. Make a 1-2" loop of fabric next to the center knot and tuck in under the middle knot to pull through to opposite side. Then wrap the fishing line around the fabric a few times to keep in place and tie the fishing line.
  5. Repeat step 4 again and then do twice on the other side of the center knot.
  6. Leave a short "tail" of fabric at each end or cut to your desired length.  
  7. Repeat for second shoe.

Floral Ankle Straps
Ruche Blog

Materials:

  • A high-heeled pump with an ankle strap
  • Lace fabric strips 2-3 inches in width
  • Plain ribbon to match the color of lace fabric
  • Needle and thread


Instructions:
To make flowers-

  1. Cut strips of fabric between 12-16 inches in length, one strip per flower.
  2. Fold the strip in half and stitch together along the edges.
  3. To give ruffled look, gather the fabric together as you sew and begin to form a circle of layers.
  4. Sew through the middle of the flower a few times and tie thread in a knot to secure.

Attach to shoes-

  1. Sew fabric flowers that you just made (or if the above steps were too complicated, you can purchase pre-made fabric flowers at your local craft store,) onto a plain, wide, grosgrain ribbon.
  2. Attach floral ribbon to strap of shoe with shoe clips or sew to the shoe's strap.

Jeweled Heels
Honestly WTF

Materials:

  • Sexy satin stilettos
  • Various sized flat back rhinestones
  • Permanent glue
  • Tweezers
  • Toothpick


Instructions:

  1. Pick up rhinestone with tweezers and dip backside of rhinestone into glue.
  2. Start pressing larger rhinestones onto top center of heel, working your way with smaller rhinestones out and down. I highly recommend laying out your design ahead of time.
  3. To affix smaller rhinestones, dip a toothpick into the glue and then apply to backside of rhinestone.

Fancy Shoe Clips
Project Wedding Blog Photos and Project Styling by Victoria Hudgins

Materials:

  • A plain, not too tall, heeled shoe
  • Colored satin ribbon 1/2 inch wide
  • Fashion feathers
  • Small plain hair clips
  • Fabric glue


Instructions:

  1. For each shoe, cut ribbon into 4 pieces, each different lengths.
  2. Take both ends of a piece of ribbon and fold to meet in the middle.  Secure with fabric glue.
  3. Repeat step 2 for each piece of ribbon.
  4. Layer the four pieces of ribbon with the longest piece on the bottom and shortest on top.  Secure with fabric glue.
  5. Attach feathers to center of ribbons with fabric glue.
  6. Allow to dry.
  7. Use fabric glue to attach ribbon/feathers to hair clip.
  8. Clip onto center of back of heel. 


Tip- Wear shoes "naked" for ceremony and clip these fancy feathers on for the reception!

Dip-Dyed Ombre Ballet Flats
Swell Mayde
Materials:

  • Cotton or suede white ballet flats
  • RIT liquid dye in your favorite wedding color- something blue?
  • Sponge brush
  • Measuring Spoons
  • Gloves


Instructions:

  1. Follow steps on RIT dye package to make your bucket of color.
  2. Dip the toes of the ballet flats into the dye for about 1 minute so that it will be a richer color.
  3. Put the whole shoe in the dye bucket for just a few moments.  
  4. To fade the color, dip a sponge brush in water and wipe off some of the color on the heel of the shoe.
  5. Allow to dry.

Bow Sandal
Swell Mayde
Materials:

  • A flat, t-strap sandal
  • Grosgrain ribbon in white or ivory
  • Hot glue


Instructions:

  1. Tie a bow with the grosgrain ribbon. Bow tying tutorials here.
  2. Glue ribbon to ankle strap of sandal.


Enjoy!  I'd love to see pictures of your DIY wedding shoes!


Thursday, June 21, 2012

DIY Word Art

Have you heard of Tagxedo?  It is a free program that you can use to create word art that you can then download to print out, make gifts, decor etc.  The program allows you to pull words from a website, twitter feed, or just type in yourself.  Pick your shape, your fonts and your colors.  The tips and tricks take a little bit of instruction.

I made this star design with words that describe my daughter Hailey and of course chose a pink theme.


Here are a few things that I have learned just messing around:
1. To make a two word phrase, put a ~ in between the two words instead of a space (see dress~up above.)
2. If you pull words from your website, etc, you can skip some words by clicking on Word Layout Options and clicking the Skip tab.
3. To choose your shape, click the arrow next to the word Shape.
4. You can choose from more shapes by going to the Tagxedo home page and clicking on Gallery, click on the picture that you want and then you can alter the picture to include your custom text by clicking the Load tab on the left.
5. To change your colors, click the arrow next to the word Theme.
6. If you only want to use each word once, click Word Layout Option, choose Layout and choose No next to Allow Replication.


I feel like this music note with inspirational words and the names of my children, would make an awesome tattoo!  White text on black font also looks pretty cool!


The sparrow above pulled words from my website, www.littlebirdcelebrations.com   don't forget, you don't have to use ALL of the words that it pulls, you can delete some by clicking on Word Layout Options and choosing the Skip tab.


I didn't make the one above with my words, I just found it in their gallery.  I did change the colors though.  How cute would this be for wedding decor adding in the names of the bride and groom?  Heck, you could make a type of "guestbook" with names of everyone who came to the wedding!